[Top] [Table Of Contents] [Prev] [Next] [Index]
6 out of 18 total pages
 

Adding a RADIUS Client   3


  This chapter includes the following topics:
  This chapter describes adding a PortMaster as a RADIUS client. There are two steps to adding a RADIUS client:

  1. Modify the clients file to add the PortMaster and shared secret.

  2. Configure the following on the PortMaster and save the configuration changes.

  ¯ Security enabled on all ports

  ¯ IP addresses of the primary and optional alternate RADIUS authentication servers; optionally configure an authentication port number different from the default

  ¯ IP addresses of the primary and optional alternate RADIUS accounting servers, if accounting is to be performed; optionally configure an accounting port number different from the default

  ¯ RADIUS shared secret

  You configure RADIUS clients using the PortMaster command line interface (see "Configuring the PortMaster Using the Command Line Interface" on page 3-2) or using a graphical user interface (GUI) (see "Configuring the PortMaster Using PMVision" on page 3-4).
 

       Modifying the clients File

  The clients  file is a flat text file installed on the RADIUS server. The clients  file stores information about RADIUS clients, including each client's name or IP address and its shared secret. Use any text editor to edit the /etc/raddb/clients  file.

  1. Verify that only root users have read and write access to the clients file.

  The clients  file contains the shared secrets for the RADIUS clients, and this information must be protected from unauthorized access.

  The permissions on a UNIX host look like this:

  -rw------- 1 root daemon 802 Jul 15 00:21 clients

  2. To add a client, enter the client's name or IP address and the shared secret. To add a comment line, start the line with the number sign (#).

  Shared secrets must consist of 15 or fewer printable, nonspace, ASCII characters. There is no limit to the number of clients that you can add to this file.

  Here are some examples of client names and shared secrets:

  #Client Name Shared Secret

  #------------------------------

  portmaster1 wP40cQ0

  portmaster2 A3X445A

  192.168.1.2 wer369st

  Note ¯ Lucent InterNetworking Systems recommends that you use IP addresses to avoid the DNS lookup time entailed by using client names and possible incorrect name translation.

  3. Go to one of the following sections to configure the PortMaster as a RADIUS client:

  ¯ "Configuring the PortMaster Using the Command Line Interface" in the next section

  ¯ "Configuring the PortMaster Using PMVision" on page 3-4


       Configuring the PortMaster Using the Command Line Interface

  To configure the PortMaster using the command line interface, complete the following steps.

  1. Enable port security on all ports using the following  command:

  Command> set all security on 

  The PortMaster tries to authenticate each user attempting to log in to a port by looking up the user in its user table. RADIUS authenticates users when port security is enabled and  the user is not found in the user table. When port security is disabled and the user is not found in the PortMaster user table, RADIUS is not  used and the user is passed through to the login host without further authentication.

  2. Enter the IP address, and optionally the authentication port number, of the primary RADIUS server using the following command:

  Command> set authentic  Ipaddress [Uport]

  The default RADIUS authentication port, 1645, is used if you specify a port number of or do not specify a port number.

  3. You can optionally specify a secondary (alternate) RADIUS server:

  Command> set alternate  Ipaddress [Uport]

  The PortMaster consults the primary RADIUS server first. If the server does not respond within 3 seconds, it is queried a second time; then both servers are queried up to eight additional times at 3-second intervals.

  4. To log activity using RADIUS accounting, enter the IP address, and optionally the accounting port number, of the primary accounting server:

  Command> set accounting  Ipaddress [Uport]

  The default RADIUS accounting port, 1646, is used if you specify a port number of or do not specify a port number.

  5. You can optionally specify a secondary (alternate) accounting server:

  Command> set accounting 2  Ipaddress [Uport]

  Lucent InterNetworking Systems recommends the use of a secondary RADIUS accounting server. The PortMaster always sends accounting packets to the primary RADIUS accounting server first, and retries it once every 45 seconds. If the primary server does not respond within 10 minutes, or if there are more than 50 accounting packets waiting to be sent, the PortMaster sends the accounting packets to the secondary RADIUS accounting server.

  6. Enter the secret shared by the PortMaster and RADIUS server using the set secret command:

  Command> set secret  String

  This is the same shared secret entered in the clients  file on the RADIUS server (see page 3-1).

  Note ¯ The shared secret is a string of up to 15 printable, nonspace, ASCII characters. If a secret longer than 15 characters is specified, an error message is displayed. Secrets in the clients  file and configured on the PortMaster are case-sensitive and must match exactly.

  7. Save your changes using the save all command; then reset all ports:

  Command> save all 

  Command> reset all 

  Caution ¯ Resetting all ports disconnects any user sessions in progress. Resetting is only necessary when changes have been made to serial ports.

  8. Continue to Chapter 4, "Configuring User Information."


       Configuring the PortMaster Using PMVision

  You can use the PMVisionTM application, a Java GUI, instead of the command line, to configure your PortMaster clients. PMVision provides all configuration options available through the older PMconsoleTM interface.
  Perform the following steps to configure a PortMaster as a client. Refer to the PMVision online help for more information on using PMVision. After configuring the client using PMVision, go to Chapter 4, "Configuring User Information."

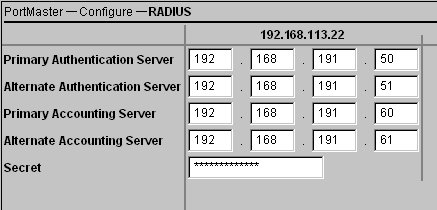
  1. From PMVision, select PortMaster·Configure·RADIUS to display the RADIUS configuration panel.

  2. Select the PortMaster you want to configure as a RADIUS client.

  3. Enter the IP address of the primary authentication server.

  4. Optionally, enter the IP address of a secondary authentication server.

  5. Enter the IP address of the primary accounting server.

  6. Optionally, enter the IP address of a secondary accounting server.

  7. Enter the shared secret.

  For security, the shared secret is not displayed in the field.

  8. Click Save....

  Figure 3-1 shows a close-up of the RADIUS panel with saved configuration settings.

  Figure 3-1 Detail View of RADIUS Configuration on PMVision

  Note ¯ The PMVision display varies depending on the version of ComOS running on the selected PortMaster. For example, if the selected PortMaster is running ComOS 4.0 or later, the RADIUS configuration panel enables you to select the ports used by the authentication and accounting servers.


[Top] [Table Of Contents] [Prev] [Next] [Index]
6 out of 18 total pages
spider@livingston.com
Copyright © 1999, Lucent Technologies. All rights reserved.