[Top] [Prev] [Next] [Bottom]
- 1. Choose a Site
- 2. Prepare the Work Area
- 3. Install a Rack Mount (Optional)
- 4. Connect a Console
- 5. Connect T1, Channelized T1, E1, or ISDN PRI Line(s)
- 6. Connect an Ethernet Cable
- 7. Turn On Power
- 8. Log In
- 9. Set the Network Address
Follow these guidelines to select a site for your PortMaster 3.
Prepare for installation by gathering the following equipment and following these safety recommendations.
-
Keep the chassis area clean and dust free during and after installation.
-
Disconnect the PortMaster 3 from the power source before working near power supplies, changing a fuse, or upgrading memory.
-
Before applying power, look for possible hazards such as moist floors, ungrounded power extension cables, or missing safety grounds and locate the emergency power switch for the room in which you are working.
-
Wear safety glasses when working under any conditions that might be hazardous to your eyes.
-
Keep tools away from walk areas where you and others could fall over them.
-
Do not work alone if potentially hazardous conditions exist.
-
Wear a grounding strap when handling the internal components of the PortMaster 3.
Warning ¯  Before working on equipment that is connected to power lines, remove jewelry including rings, necklaces, and watches. Metal objects will heat up when connected to power and ground and can cause serious burns or weld the metal object to the terminals.
If an electrical accident occurs, turn off the emergency power switch for the room in which you are working, cautiously unplug the system's power, and get medical assistance for any injured person.
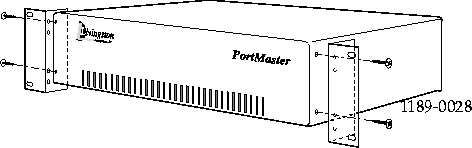
Follow these instructions to attach the PortMaster 3 to a rack.
-
Remove the plastic plugs from the mounting holes in the chassis by inserting a flathead screwdriver under the plug edge and prying the plug loose.
-
Mount the angle brackets to the sides of the PortMaster 3 using four 12-24 screws so that the top edge of the angle bracket is aligned with the top of the PortMaster 3.
-
Attach the PortMaster 3 to a rack using four 12-24 screws so that the front of the PortMaster is flush with the front of the rack.
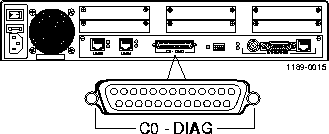
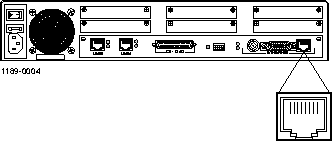
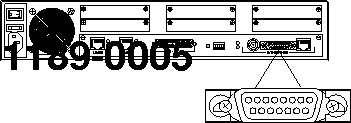
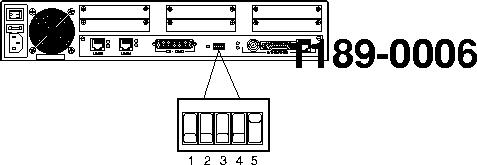
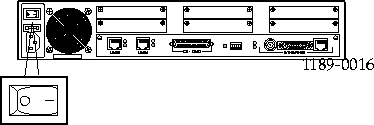
Follow these instructions to connect a console.
-
This cable and adapter are available from most computer equipment suppliers.
-
Attach one end of the cable to the PortMaster 3 console port, and attach the other end to the serial port of a PC or terminal.
-
Ensure that DIP switch 1 is up.

-
Set the terminal to 9600 baud, 8 data bits, 1 stop bit, a parity of none, and software flow control (XON/XOFF).
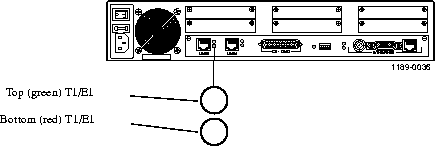
Follow these instructions to connect a T1, channelized T1, E1, or ISDN PRI line(s) to the T1/E1 port(s) if you have already ordered the service from the phone company.
Call your local telephone service provider to order T1, channelized T1, E1, or ISDN PRI service and to find out about service availability, pricing, features, and wait time. Typically you must pay an installation charge, a monthly flat-rate service charge, and usage charges.
-
One of these cables is included for each T1/E1 port. Additional cables are available from
most computer equipment suppliers.
Connect a line to the T1/E1 port.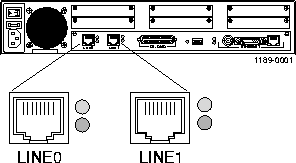
To connect a 75-ohm coaxial cable to an E1 port with an impedance of 100 ohms, use a 75-ohm to 100-ohm impedance-matching adapter available from most electronic equipment suppliers.
Note ¯  The PortMaster 3 has an integrated channel service unit/digital service unit (CSU/DSU). However, the other end of a T1/E1 connection might require an external clock signal provided by the telephone company or a (CSU/DSU).
The following Ethernet cables can be connected to the PortMaster 3 (See "Ethernet Interface" on page B-5 for specifications.)
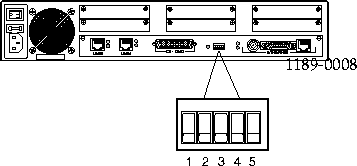
Follow these instructions to connect an Ethernet cable to the Ethernet 10BaseT port.
-
This cable is available from most computer equipment suppliers.
-
Connect the cable to the Ethernet 10BaseT port.
-
Set DIP switches 4 and 5 up.

Follow these instructions to connect an Ethernet cable to the Ethernet AUI port.
-
This cable is available from most computer equipment suppliers.
-
Connect the cable to the Ethernet AUI port.
-
Set DIP switch 4 down and DIP switch 5 up.
Follow these instructions to connect an Ethernet cable to the Ethernet BNC port.
-
This cable is available from most computer equipment suppliers. The BNC
T-adapter is included with the PortMaster 3.
-
Connect the cable to the Ethernet BNC port using the BNC T-adapter.

-
Terminate the 10Base2 cable at both ends using a 50-ohm terminator cap.
Warning ¯  One terminator cap of a 10Base2 Ethernet chain must be grounded to prevent damage to Ethernet equipment.
-
Set DIP switches 4 and 5 down.
Follow these instructions to start the PortMaster 3.
-
Attach the PortMaster 3 to a power source.
-
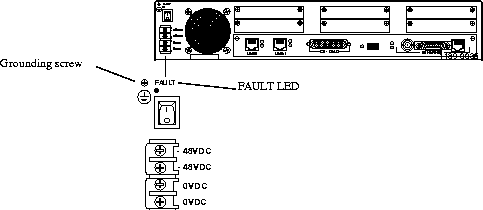
The DC PortMaster 3 has two -48VDC terminal blocks and two 0VDC terminal blocks
so two power sources can be used. If you are using a single -48VDC power source, use
the provided jumpers to short the two -48VDC and OVDC inputs together.
Note ¯  The FAULT LED of the DC PortMaster indicates power difficulties. If it is blinking, the fan has stopped rotating and the unit should be taken out of service. If it is solidly lit, one of the redundant power converters has failed. The unit can continue to operate but should be repaired when convenient.
-
Turn the power switch on.
-
If you are using T1, E1, or ISDN PRI, verify that the top (green) T1/E1 LED is solidly lit.
-
If the bottom (red) T1/E1 LED is solidly lit, see Appendix A, "Troubleshooting."
-
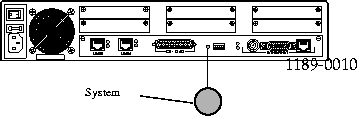
Verify that the system LED blinks three times per second on power up and then stays solidly lit with an interruption once every 5 seconds.
-
System LED behavior might vary, depending on the version of ComOS.
-
If the system LED does not behave in this way, see Appendix A, "Troubleshooting."
-
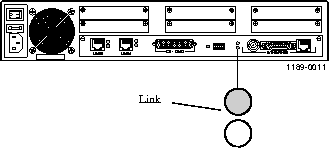
If you are using the Ethernet 10BaseT port, verify that the link LED stays solidly lit.
-
If the link LED does not behave this way, see Appendix A, "Troubleshooting."
-
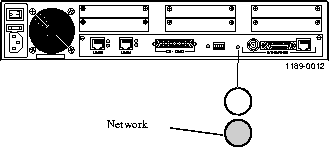
Verify that the network LED blinks when Ethernet traffic is present.
-
Heavy traffic can cause the network LED to blink so rapidly that it appears to be solidly lit.
-
If the network LED does not behave in this way, see Appendix A, "Troubleshooting."
Follow these instructions to log in to the PortMaster 3.
-
From the login prompt, type !root and press the Enter key.
-
From the password prompt, press the Enter key-no password is needed
-
login: !root
-
Password:
-
Command>
Set an IP address and netmask for an IP network and/or an IPX network number and frame type for an IPX network.
Follow these instructions to set an IP address and netmask for the PortMaster 3.
From the command prompt, enter the following information, pressing the Enter key after each line.
Replace the italicized values with values appropriate for your network.
Command> set ether0 address 172.168.200.1
Command> set netmask 255.255.255.0
Command> save all
Command> Quit
Follow these instructions to set an IPX address and frame type for the PortMaster 3.
From the command prompt, enter the following information, pressing the Enter key after each line.
Replace the italicized values with values appropriate for your network.
Command> set ehter0 ipxnet AFAF0808
Command> set ether0 ipxframe ethernet_802.2
Command> save all
You can use either of the following to configure the PortMaster:
-
Refer to the PMconsole for Windows Administrator's Guide for configuration instructions.
Note ¯  You must use the command line interface to configure certain ComOS features such as the Open Shortest Path First (OSPF) protocol and the Border Gateway Protocol (BGP) on the PortMaster 3.
[Top] [Prev] [Next] [Bottom]
spider@livingston.com
Copyright © 1998, Lucent Technologies. All rights
reserved.
 .
.