[Top] [Prev] [Next] [Bottom]

Troubleshooting        A


This appendix provides the following troubleshooting procedures for the PortMaster 3:

Observing LED Behavior

Table A-1 identifies LED behavior, possible causes of the behavior, and potential solutions.

For information on contacting technical support, see "Contacting Lucent Remote Access Technical Support" on page xii.
Hardware Problems and Solutions

LED Behavior

Possible Cause

Solution

System LED does not light.

Power is not present.

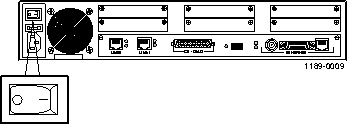
Check the power switch, power cable, outlet, and fuse. For instructions on checking and changing the fuse in the AC version, see "Replacing a Fuse" on page A-7.

Contact Lucent Remote Access Technical Support if power is not present on the DC version.

A T1, E1, or ISDN PRI line is connected to a T1/E1 port and the bottom (red) T1/E1 LED stays lit.

The PortMaster 3 does not recognize service from the telephone company.

Contact the telephone company.

During startup, the system LED fails to light, stays lit, or blinks three times per second continuously.

A hardware problem has occurred.

Contact Lucent Remote Access Technical Support.

During startup, the system LED blinks once per second for more than a minute.

Immediately after booting, the system LED stays solidly lit or does not light.

Note: This behavior does not refer to the boot sequence, during which the system LED is not lit for between 5 and 7 seconds.

A component might have loosened during shipping.

Open the PortMaster 3 using antistatic precautions (see "Safety Recommendations" on page 2-3). Verify the following:

During operation, the system LED stays solidly lit or does not light.

A hardware problem might have been caused by an external device.

If the LED stays solidly lit or does not light after you have removed all external devices, contact Lucent Remote Access Technical Support.

No console login prompt is displayed.

Terminal settings are incorrect or a connection or cable is inoperable.

The link LED is not lit when connected to a 10BaseT Ethernet hub.

There is no link integrity.

Verify that DIP switches 4 and 5 are up and that you have a working 10BaseT cable properly connected to the PortMaster 3 and to the hub. Turn the power off and on to activate the DIP switch setting.

Network LED is solidly lit.

Heavy traffic can cause the network LED to blink so rapidly that it appears to be solidly lit.

However; If packets cannot be passed, you might have an incorrectly cabled network.

Verify that the network cabling is correct.

Network LED is not lit.

If the PortMaster 3 is not receiving, or sending traffic, the network LED is not lit.

Verify that the network cabling is correct.

An undefined difficulty occurred at startup, but the cause cannot be determined from LED behavior.

Refer to the solution column.

Try booting in console mode, and observe the boot messages. See "Observing Boot Messages" on page A-4. If the boot messages do not suggest a solution, record the information and contact Lucent Remote Access Technical Support.

Observing Boot Messages

If you are having difficulty booting the PortMaster 3 and are unable to isolate the problem by observing LED behavior, boot the PortMaster 3 in console mode and check the boot messages.

Follow these instructions to check boot messages:

  1. Attach a console (see "Connect a Console" on page 2-5).

  2. Turn on power (see "Turn On Power" on page 2-10).

  3. Observe the boot messages displayed on the console screen.

    Note ¯ Boot messages vary slightly, depending on the version of the PROM and ComOS and whether modem cards are installed.

    The following example is from a PortMaster 3A-2T:

    Livingston Enterprises, Inc. Boot Prom Rev N


    Testing Low Memory....

    Testing System Clock....

    Testing System Memory.... 1024K

    Checking Boot Rom....

    CPU Type.... 486DE2-66

    Starting FLASH Boot.....

    Booting From Flash Type Am29F040

    Loading Image at 0fff0000

    17048 flash copy complete

    Verifying Load Module Checksum...

    Starting Load Module ...

    Loading kernel... 619172 bytes

    Testing High Memory .... 4096K

    Found 47 ports....

    ether0 active... 64K burst-IO

    Running ComOS...


    PortMaster Console login:


    Interpreting Diagnostic Boot Messages

    Field

    Possible Message

    Explanation

    Boot Prom Rev

    N

    Version number of the installed boot PROM.

    Testing Low Memory

    ERROR

    This error indicates a boot failure. Record all information to this point and contact Lucent Remote Access Technical Support.

    Testing System Clock

    ERROR

    This error indicates a boot failure. Record all information to this point and contact Lucent Remote Access Technical Support.

    Testing System Memory

    ERROR at failed memory address.

    This error indicates a boot failure. Record all information to this point and contact Lucent Remote Access Technical Support.

    Checking Boot Rom

    ERROR

    This error indicates a boot failure. Record all information to this point and contact Lucent Remote Access Technical Support.

    CPU Type

    486DE2-66

    The type of CPU installed.

    Starting FLASH Boot

    N/A

    N/A

    Booting From FLASH Type

    Am29F040

    Flash brand name.

    Loading Image at

    0fff0000

    RAM address.

    flash copy complete

    17048

    Counter for Flash bytes transferred to RAM. If the counter freezes, record all information to this point and contact Lucent Remote Access Technical Support.

    Verifying Load Module Checksum

    Invalid Length for Flash at RAM
    address.

    This error indicates a boot failure. Record all information to this point and contact Lucent Remote Access Technical Support.

    Starting Load Module

    N/A

    N/A

    Loading kernel

    619172

    Size of kernel image in bytes.

    Testing High Memory

    ERROR at failed memory address

    This error indicates a boot failure. Record all information to this point and contact Lucent Remote Access Technical Support.

    Found x ports

    Integer between 2 and 61

    Number of ports found, including C0.

    ether0 active

    64K burst-IO

    Ethernet interface found.

    Running ComOS

    N/A

    If system becomes suspended at this point and does not print the next message, the configuration nonvolatile RAM (NVRAM) has been corrupted. Refer to the PortMaster Troubleshooting Guide for instructions on NVRAM recovery.

    PortMaster Console login:

    N/A

    System is up and running.

    Use Table A-2 to interpret possible diagnostic boot messages.

Replacing a Fuse

If your PortMaster 3 loses power while connected to an active power source, check the fuse.

Follow these instructions to check and replace the fuse in the PortMaster 3.

Required Equipment

Procedure

  1. Turn the power switch off and disconnect the PortMaster 3 from the power source.

  2. Detach the power cord from the PortMaster 3.

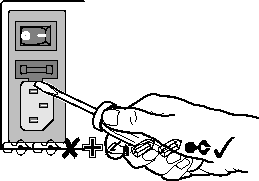
  3. Insert a 5/32-inch flathead screwdriver between the fuse door and the chassis, and gently pull the fuse door open.

  4. If the white outer coating of the fuse is discolored (burned), replace the fuse.
    The fuse can be inserted from either end.
  5. Press the fuse door shut until it clicks.

  6. Reconnect the power cord to the PortMaster 3.

  7. Turn the power switch on.


[Top] [Prev] [Next] [Bottom]

spider@livingston.com
Copyright © 1998, Lucent Technologies. All rights reserved.